
Do you remember the last winner of “TourDash tour of the month”? In that tour a cool solution of custom colors for the tour elements was used.
In this post we’ll tell you how to use elements custom colors for your tour.
To modify the colors of the elements of the tour you need a little knowledge of HTML and CSS. But even if you don’t know don’t worry, we have prepared ready-to-use snippets of code that you can use in your tour.
To edit TourDash tour CSS-styles, you should have access to the CSS panel. It’s located on a Labs editor tab. If you don’t see such tab, please, write a request to support@tourdash.com and we will include this functionality to your account.
So, first let’s change the background and text color in the navigation menu. Â In order to do this copy the following snippet to CSS-panel, and click Apply Styles.
The following snippet will allow us to change the highlight color of the active item in the navigation menu.
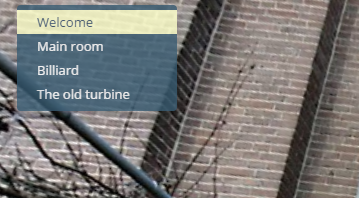
So we’ve got such navigation menu:
However, for a complete transformation, we still need to change the popups’ color. Let’s proceed. To begin let’s change popup background color.
Now, popups’ text color and heading color.

Well, now we’ve changed colors of all the main elements of the tour. In conjunction with custom markers for dynamic hotspots and custom fonts you can get a unique design and ambiance for your tour.
Comments are closed.
Hello, How do i Hover and change color of fronts and background only on links in the pop up menus? thanx
Hello! It requires custom CSS styles. Please redirect your question to support@tourdash.com.