
TourDash technical digest
Hello dear TourDashers! Every day we get a lot of technical questions which once have been already nicely in a detailed way answered in our blog. So we’ve decided to collect all the technical posts into one helpful digest. And it’s just down here in this post! Please bookmark it somehow for your own convinience! 🙂
Let’s go!
Custom colors
In conjunction with custom markers for dynamic hotspots and custom fonts you can get a unique design and ambiance for your tour.
Custom fonts
Custom font is a very important part of brand-management and also it’s just beautiful. Make your own tour with your own fonts and look how easy it is!

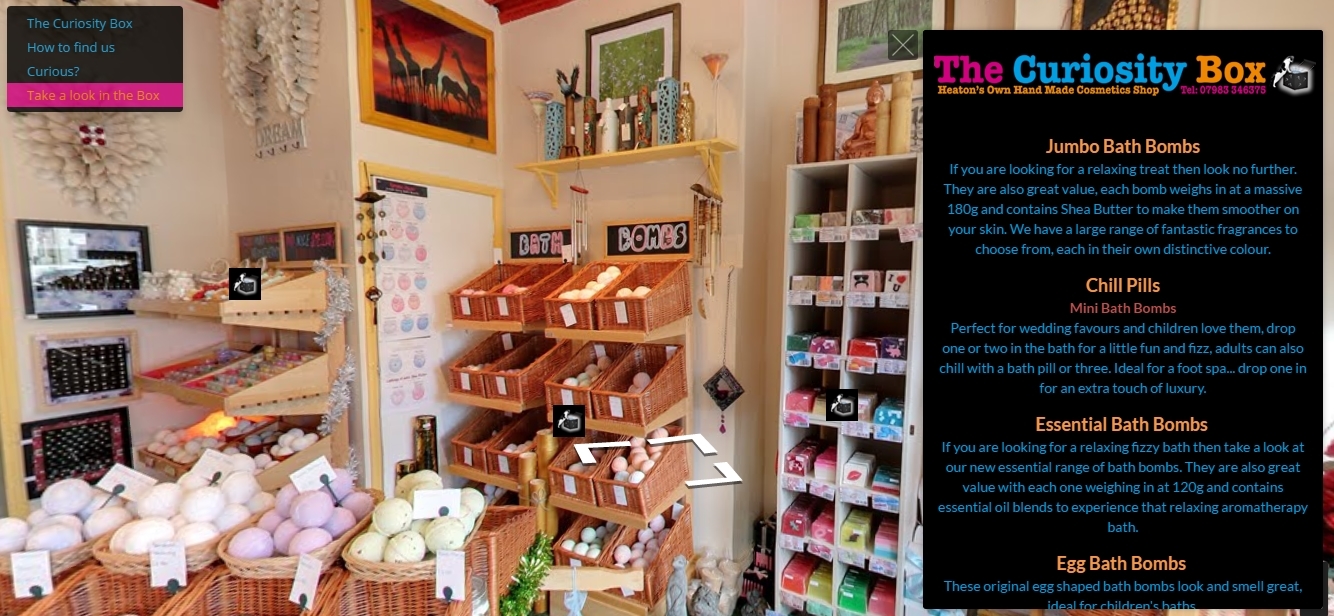
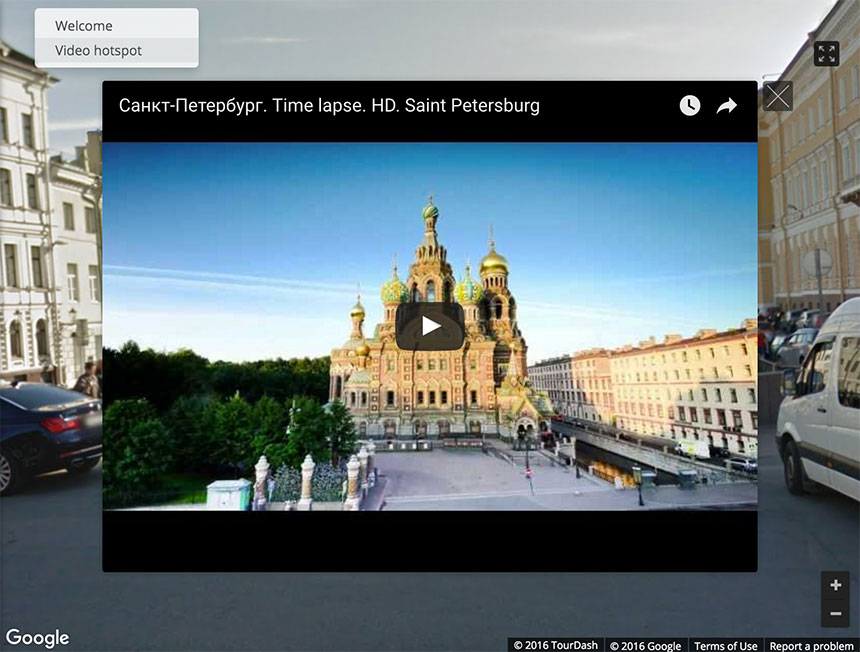
Borderless designed hotspot for embedded video
Advanced HTML and CSS editing gives you unlimited opportunities of your TourDash tour customization!
Logo in a navigation menu
This small feature will help you to make your TourDash tour more good-looking and attractive for your visitors.
![]()
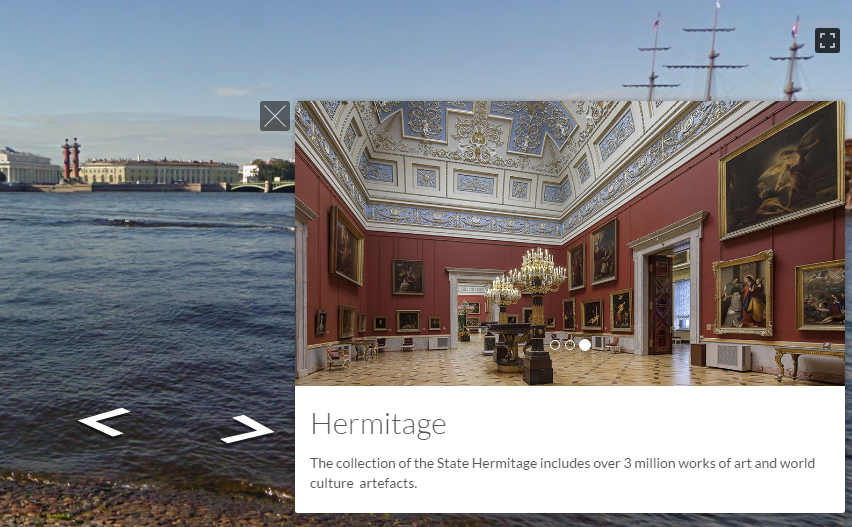
Images in a dynamic carousel
This functionality can be useful in many areas – real estate and hotels, restaurants and shops, etc.
And of course don’t forget that you can find all the basic TourDash technical information on the support page on our website: features description, account use, payments, specifications. Also there is product information, frequently asked questions and more. There are over 50 articles, instructions and tutorials about all aspects of TourDash use.
If you have any technical questions about TourDash send them all to support@tourdash.com. This is the best way to get a quick answer from our specialists.
What other technical instructions do you want to see in our blog?
10 awesome virtual tour tips
Hello there! It’s not a secret that a nice looking and informative virtual tour sells your product easier. No matter if it’s a real estate, restaurant, shop or event, the more interesting your tour is the more clients you attract through it. Here is 10 tips how to make a stunning virtual tour that sells.
Organizing the area
1. Choose locations that will be represented in a tour. Don’t try to accommodate everything in your tour. Decide which rooms look better. If possible, choose rooms that have lots of light over rooms that may look dull and dark. A light area will always have more appeal.
2. Make a thorough cleaning of the place. Everything should be perfectly looking and well-conditioned. A professional photo camera can capture even a barely noticeable flaw in a room. So make sure all the area is prepared: any stains are removed and any form of fabric (curtains, bed sheets, table cloths) are stroked and arranged as required. Also don’t forget to remove any undesirable signage for example wet floor or some other temporary signs. Check all the light bulbs and replace any blown or miss matched bulbs.
3. Add some coziness to the place. Put fresh flowers, candles and other interesting interior or exterior details to your place. Arrange chairs and tables in a neat manner and make sure any soft furnishings are arranged and plumped to your standards. Make an attentive review of your place to find out how to make it more pleasant looking in a photo shot.

Shooting
4. Plan the exact time of the photo process. What part of the day is your place looking better at? In the morning in the first bright sunlight or during sunset time? Or do you want to show an amazing view of stellar sky which visitors can observe on the roof? For majority of places the best option is a sunny day. So if it’s raining today it might be better to reschedule the photoshooting.
5. While you’re taking pictures, don’t forget to snap some shots of the community and the best places in the neighborhood. People who are planning to visit your organization may want to know about the area they’ll be chilling/working/studding/etc at, and if you can show them it’s a great neighborhood, you’ll grab their interest. Always include shots of the outside of your storefront or property and the entrance. You may want to include a shot of the door opening too, or a walk in from outside to inside. That also can help people to find the place.
6. Vary your photo types. A virtual tour that simply shows room shot after room shot can be pretty boring. Instead, take multiple pictures of each room from different angles, with different zoom areas, and choose the best of those pictures to include in your virtual tour. You can also vary the number of photos used for each area. Such as including several shots of the living room with fireplace, balcony and cathedral ceilings, but only one or two of the standard-issue bedrooms.
7. Sometimes to have people on the photo is a great idea. They can be your employees with funny masks, heads or some singes in hands. Or you can put some special sings somewhere in the area. For example offline stickers for online buttons like it was made here. It can be a creative way to be memorized and stand out from competitors.
TourDash marketing tools
8. Add extras to your virtual tour. Stunning photos are the heart of a virtual tour, but additional information can really sell a product. Create an interesting and beautiful hotspots with photo gallery, video, social buttons, links to your website, promotion information and so on. Turn on your imagination to enrich the tour with an amazing content.
9. Personalize a tour, make it different. Create a branded layout, use your logo, custom fonts and colors. Decorate your tour with unusual elements like offbeat buttons or picturesque pop-up window. Implement all your bold ideas using CSS editor. What if the whole tour will be like one interesting story which your target audience will be happy to go deeper in? Check out our blog to find ideas for inspiration looking through the “TourDash tour of the month”.
10. Think carefully about texts! Or even don’t neglect to hire a copywriter to fill hotspot windows inside a tour. Short, smart, beating accurately at the target words obviously can help you sell your product or service. A common mistake is an inadequate usage of hotspot space. A lot of texts in virtual tours are or too small, or too long, or too boring. Hotspot is a great advertising field. Describe company or product advantages, underline main profit for your customers, be clear and communicative.

For now that’s it! Hope you find it useful!
If you liked this post please share it with your friends in social media! 🙂
Write in a comment what you would add to this list! Then we’ll continue the topic in our blog and publish the second part.
New tour settings in a TourDash editor
Hello there! If you haven’t noticed yet there is a new “Tour settings” tab in a TourDash editor. Now you can set an appearance of your Google virtual tour.
For example you can turn off a mouse wheel scroll zoom or adjust visibility of Google panoramas’ controls. For instance it’s possible to hide all the controls and allow the dragging only with the help of the mouse.
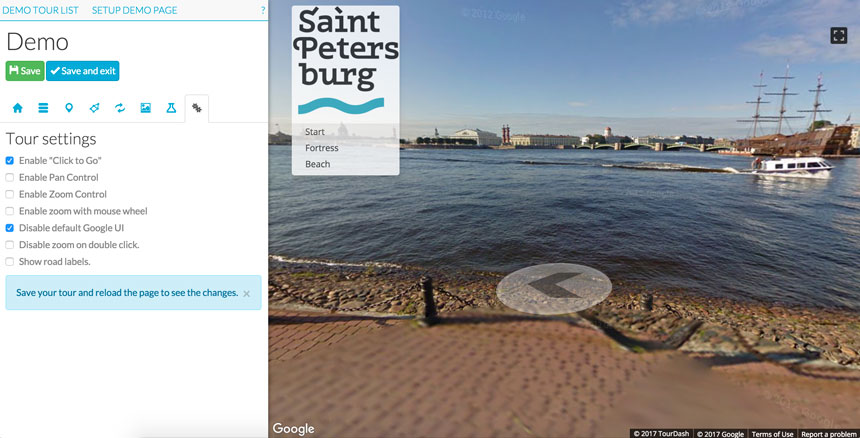
We’re going to add more new options for you to increase opportunities to customize TourDash tours. Stay tuned and please contact us for any questions writing to support@tourdash.com.
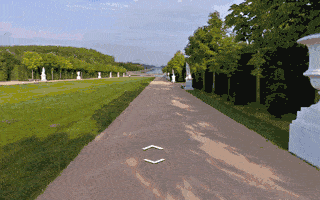
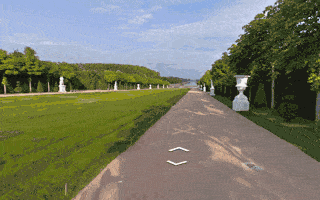
How to merge several images into a dynamic carousel
Hello Tourdashers! It has been a while since the last time we published some technical posts. In today’s post we explain how to merge several images into a dynamic carousel. This functionality can be useful in many areas – real estate and hotels, restaurants and shops, etc.
To edit TourDash tour CSS-styles, you should have access to the CSS panel. It’s located on a “Labs” editor tab. If you don’t see such tab, please, write a request to support@tourdash.com and we will include this functionality to your account.
To see an example of such carousel in TourDash tour
First of all upload images you want to use in a dynamic carousel. All the pictures should be the same size, otherwise the carousel may look crooked.
Next, create a hotspot and use the following snippet as a basis for your code:
If you want to get the carousel without white borders (as in an example), use the following snippet for your CSS styles. To add it go to the “Labs” panel.
For any question please contact us! 🙂
TourDash News
Hello everyone! We have a couple of great news for you!
Google Maps API Upgrade
We have upgraded TourDash to the latest version of Google Maps API. Google has introduced a lot of new features and significantly improved the quality of panorama rendering in this version. Here are some of the improvements:
Smoother Transitions
Transitions from one point to another in Street View now include more animation frames, creating the effect of gliding smoothly to the next location. Transitions in the old renderer looked like jumping from one location to another.
| Old renderer | New renderer |
 |
 |
Smoother Loading Animations
The old renderer repeats images while loading new content, resulting in a stuttering effect. The new renderer uses lower resolution imagery while loading, resulting in a smoother animation when rotating an image in Street View.
| Old renderer | New renderer |
 |
 |
Object modeling improvements
Objects in Street View look better in the new renderer because it builds a 360-degree model that considers all possible perspectives. For example, this high rise building has wavy lines in the old renderer, as opposed to crisp lines in the new renderer.
| Old renderer | New renderer |
 |
 |
Full support of Google Photospheres
As you now, we had a limited support for Google Photospheres before. You could use photosphere but the only way was to add them as an external location to an already existing TourDash tour. We have updated our application, so now you can create TourDash tours starting from Google Photospheres without any restrictions!
Stay tuned and read our blog, more updates are coming this year!
How to insert a logo into a navigation menu
Hello everybody! This week we want to share with you some useful technical information. This small feature will help you to make your TourDash tour more good-looking and attractive for your visitors.
Some of you have asked us about setting up a logo inside the navigation menu. This is a really simple process. Just follow this 5 steps!
Step 1 – prepare a logotype image. It should be saved in PNG format with transparent background.
Step 2 – upload logo to your TourDash account. Navigate to live.tourdash.com/assets, upload the image and copy it’s direct url by right-clicking the uploaded image and choosing “Copy link address”.
Step 3 – open your tour editor and navigate to the CSS editor. Please write to support@tourdash.com to get an access to the CSS panel if you don’t have one.
Step 4 – modify our snippet, place link to the logo from Step 2, adjust padding.
Step 5 – Save your tour and enjoy! 🙂
![]()
TourDash Total Statistics
Good morning everybody! How is it going? Today we want to share with you our statistics for all 2,5 years of TourDash existance. It was interesting to collect data and look at the dynamics. Please pay attention that 2016 is still going, so the stats of this year isn’t full for now.
Let’s start from the tours:
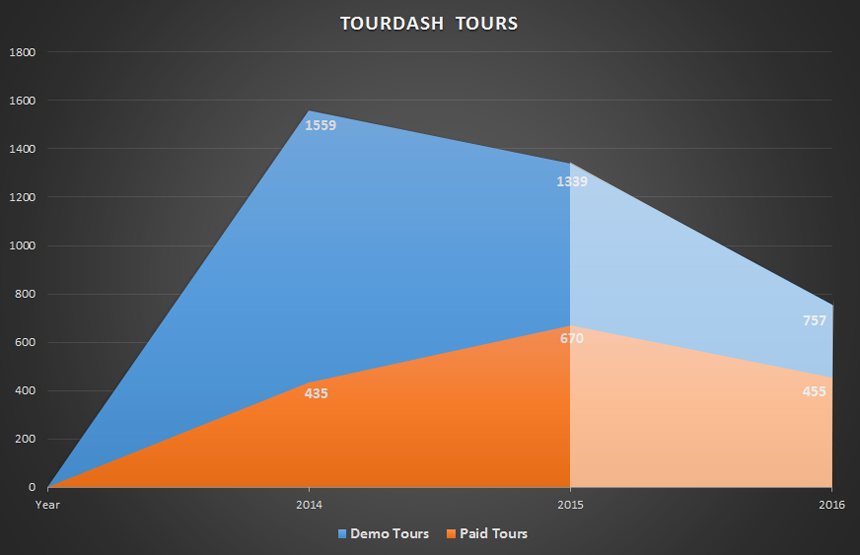
So, during all this time in total 5212 Tourdash tours were created: 3655 Demo and 1560 Paid ones. The number of demo tours is going down, but paid tours are growing. That’s exciting! The most using feature in Tourdash tours is Advanced Navigation.
Some numbers about TourDash resellers:
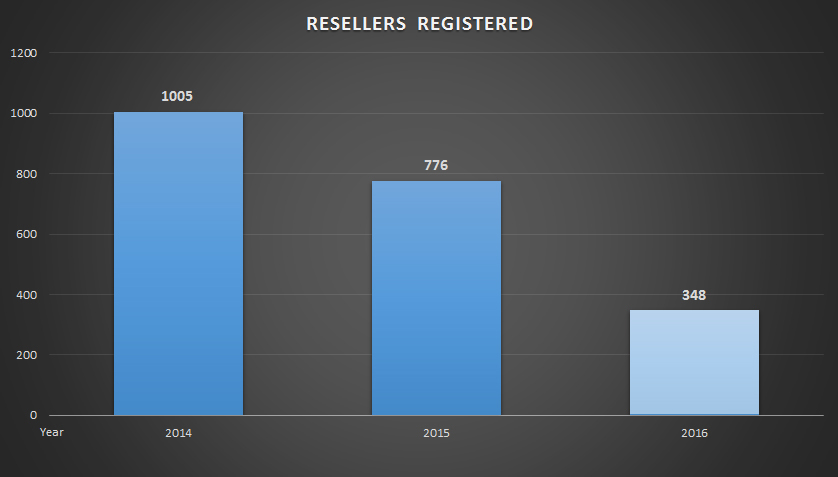
In total 2129 resellers are registered in TourDash since 2014. This is more then 2 new resellers every day. That is great! We are glad to work with everybody! 🙂
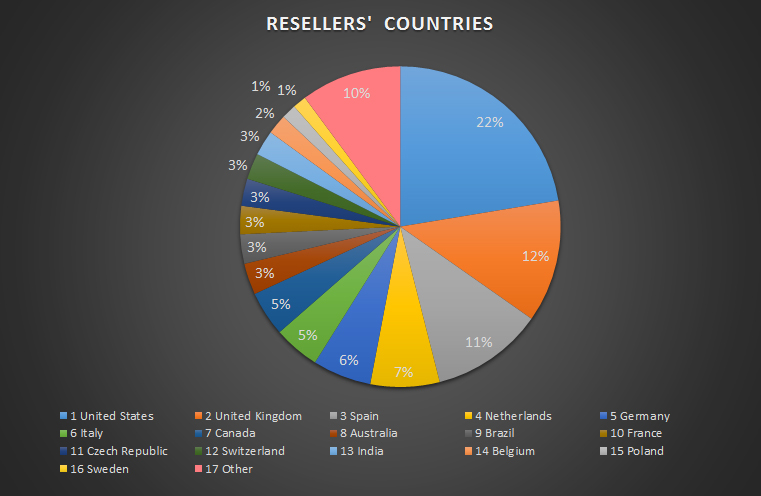
And at last here are top 16 countries from were resellers have registered. We could use data only from fully filled profiles, though. If you haven’t specify your country, we don’t count you here.
That is all for now! What else is interesting for you for the next statistics post?
Top 5 FAQs to the TourDash support. PART 2
Hello everybody! This is the second part of our post where we answer your most frequently asked questions to our support team. If you still have any enquiries after reading the letter please feel free to write us to support@tourdash.com. The first part you can also read in our blog.
And of course don’t forget to check our Support Page, we update information there regularly. If you think that we need to include some more information to this section, please let us know!
Top 1. Can a demo tour be converted to a real virtual tour?
The â€Assign to a client†option (under “Actions†on the “Demo Tours†page in your reseller account) lets you assign a Demo Tour to a client and a license, therefore converting it to a real virtual tour.
Learn more
Top 2. How can I publish a demo tour?
Within the Demo Tours page of your reseller account you have the ability to create an unlimited amount of Demo Tours and embed them on your own website or on the demo page.
Please note: Demo Tours can only be published on the website that you have given us when setting up your reseller profile! Publishing on other websites or Facebook is not possible for a Demo Tour.
Learn more
Top 3. How can I update my existing TourDash tour with new panoramas?
If you completely reshoot an existing Google Street View tour (or just add some extra panoramas to it) and publish it on Google, you will have to create a new TourDash tour for your updated panoramas from scratch.
Learn more
Top 4. Where is the virtual tour equipped with TourDash available?
Since TourDash is not integrated into the Google Maps servers a virtual tour equipped with TourDash is only visible by using the iFrame code by which the TourDash tour can be exported to a client’s website, Facebook page or blog. As a result the additional elements of the tour created with TourDash are not visible when viewed directly from the Google places or Google Maps pages.
Learn more
Top 5. How to publish TourDash tour on Facebook?
We have a built-in option to publish your virtual tour on Facebook. Once you’ve clicked on “Embed tourâ€, a new page appears. In the lower left corner there is a blue “Publish to Facebook†button.
Learn more
July 12 – International Photographers' Day!
Hello dear TourDash resellers! We are glad to congratulate you on your professional holiday – International Photographers’ Day!
Despite the fact that World Photography Day is celebrated annually on 19th of August, there is one more special day for everybody who is indifferent to photography – International Photographers’ Day which is celebrated worlwide today – on 12th of July. This is a perfect opportunity to tell you thank you for your work  one more time and wish each other all the luck!
Today a camera is accessible to everybody, but not everyone possesses the art of photography. You are all great professionals here, people who have a gift of catching instants of life and a talent to capture rare moments in a shot. So this is your day! Enjoy it and share with your collegues making new awesome photographs! 🙂
We are happy to work with such talented photographers as you are! We wish you a lot of success on your professional way and many-many-many good clients! 🙂 Thank you for choosing TourDash!
Announcement about TourDash support
Good afternoon everybody! Small announcement about TourDash support.
As you know our support team answer all requests within 24 hours. But we found out that sometimes for some reason some problems with letters delivery apear. We are working on the solution on that issue.
If you haven’t received an automated response from the ticket system in 15 minutes it means your email hasn’t reached us. Please try sending your request again or duplicate it in a Facebook message on our page. We answer Facebook messages within 30 minutes in average.
Thank you all for choosing TourDash!